Friday, February 27, 2009

Gluten-Free Pierogies: Long Time Coming

Conte's Gluten Free Potato and Cheese Pierogies

Conte's Gluten Free Potato and Cheese Pierogies

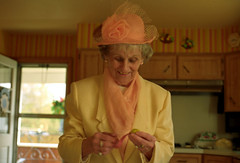
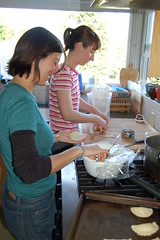
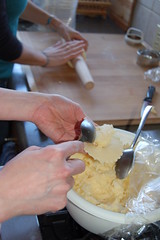
My grandmother loves Pierogies. As do all her children and their children's children. For me, they are the sacred, comfort, feasting, holiday, every day food of my youth. When visiting their house to this day, my grandparents serve up pierogies almost as quickly as they do hugs. And I won't soon forget the magical afternoon three of my closest friends and I spent making pierogies from scratch in my current home: three expatriot Pennsylvanians (and one native) cooking soul food. We ate nearly four dozen pierogies that day.

My grandparents serve up pierogies in lots of butter, onions, and cabbage. It's a simple dish that warms my heart and tummy. A side of thick, heavy bread and horseradish; or if for brunch with potato pancakes and sour cream.

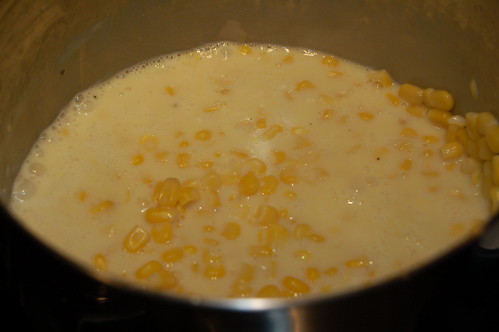
I opted for the former: boiled for 7 minutes while a diced onion simmered in an ungodly amount of Smart Balance butter, drain pierogies and add to butter/onion mixture. I kept them on the burner while we finished our creamed corn side, browning each pierogi on each side. It's not the same method Frankie used (just straight up frying), but it's more conducive to the frozen variety.

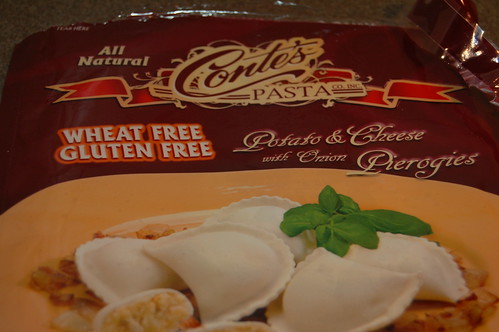
Since the whole celiac diagnosis, I have been pierogi free. This is a crying shame. For a Valentines Day present, Quincy purchased six bags of Gluten-Free pierogies from an east coast producer, shipped to our house one-day freezer pack.

The only brand of gluten-free pierogies Q's found (so far) are (sort of) available on Amazon (of course): Conte's Gluten Free Pierogies. As you might guess, a giant ravioli filled with mashed potatoes and cheese and onions isn't difficult to make without wheat, and the end result is a gluten-free pierogi that does not stray from the Mrs. T's standard. We're encouraged now to try it ourselves, from scratch. I might have to fly in Frankie and Regina; while I'm at it, Baba and Champ.

Champ, the day after Orthodox Easter, 2003Baba, Orthodox Easter 2003

Frankie and Regina smooshFrankie and Regina smoosh and roll

Ten Acres Enough

Home made creamed corn

(For Q, in the style of the book she is reading from the Seattle Public Library: Ten Acres Enough; published in 1864. I'm not done writing about the wonderful experience of eating Pierogies yet, but figured I could post the side-dish blog first.)

The side dish was, at least at first before the run of groceries necessitated by a surprising shortness of onions and of our lifeblood, Diet Coke, decided on in agreeable fashion based on the the meager contents of our fridge, freezer and cupboard in the category of "vegetable," which being late in the grocery shopping cycle -- despite our considerable and largely successful efforts to stock up on shelf-stable staples -- left us with wilted carrots, frozen bags of peas and corn, and canned artichoke hearts that quite possibly predate our initial meeting at the base of the hill at Gasworks Park, that summer day nearing two years ago. While creamed corn is not traditionally a side accompanying pierogies, we are not in our minds a tradition-bound couple. To that, I submit our zombie-voiced cat and affinity for odd books.

While I slaved, though good spirited for certain, over the left side of our Viking gas range (the envy, I must say, of the neighbors who go without for trade of boat and towed camper) over the twelve precious pierogies, Quincy began the preparation of the creamed corn. Many would assume she shucked, grated, cut free of cob, and washed the kernels from fresh ears, but being a woman of much learning, and a specific frugal nature for things which frugality does not harm (mind you, she is not such the woman to be penny wise and pound foolish, sparing no expense to ship the frozen pierogies from the East Coast overnight to ensure proper freshness; she does know that winter corn would fly great distances beyond which crispness cannot hold), she opened two cans of organic corn kernels. With those rinsed quickly, she turned to the right side of the stove and mixed a small amount of organic half & half and Smart Balance butter, thinking to spare at least in part my heart for future meals and life-long love, in a small pot. To this she added incremental half-teaspoons of corn starch, and eventually, the corn and a measured dose of sweet sugar.

This woman I so admire stirred my soul as the stirred the pot: the rich, sweet smell of summer wafting through the kitchen -- my mind might have wandered to the un-sewn sundress in the sewing room and, again, our first meeting and the bright orange t-shirt she wore, her puppy dragging her towards me -- but my concentration was not lost so much as to allow my own portion of the meal to go burnt. She loves me for my practical nature, for certain. Let us remember, finding a woman with such dedication in honest nature, with qualities suggesting design by Higher Good, is not to be taken in a light manner, nor thought about in such detail as to stifle.

To summarize:

Two cans of organic corn kernels
1/2 cup of Smart Balance butter (to taste)
1/4 cup of water
1 tsp sugar
1/2 cup organic half & half
2 tsp corn starch
1 Organic Quincy

Wednesday, February 25, 2009

Gluten-Free Breaded Mack and Cheese

Crusted mack and cheese

In the back of my head there's an unofficial and likely corrupt list of things I haven't had since being diagnosed with celiac. On that list is breaded macaroni and cheese. Actually, the list entry just says "breaded."

Quincy had the idea of saving the butts and stale slices of her homemade gluten-free breads in the freezer. On Saturday night we broke them out to indulge our cheese needs.

Here's the basic recipe, since neither of us really keep track.

16 oz (2 boxes) of Ancient Harvest Quinoa pasta (elbows)
8-12 oz of freshly grated Tillamook medium sharp cheddar
8-12 oz of grated mozzarella
4 oz of freshly grated Parmesan
2 medium vegetarian-fed, hormone-free eggs (I can't wait until I have my own hens.)
1 large head of chopped broccoli (makes the dish look like it might be healthy. It's not.)
1 large red onion, copped
2 cups of gluten-free bread crumbs
2 tbs Smart Balance buttery spread
Salt and Pepper to taste

We boiled the pasta for about 5 minutes, half the time recommended on the box. While that's going, we put a little corn oil in a big, deep pan and cook the red onions until transparent and yummy looking. We remove the pan from heat and drop the drained pasta in and add the chopped broccoli as well. I moved a big glass baking pan over the burner that warmed the past and dropped in the butter.

In the mean time, we've combined the mozzarella and cheddar with two beaten eggs to form a gooey mess. We added a little Parmesan at this point, but only a little.

We use a silicon basting brush to spread the melty butter in the class baking pan. We spooned about half the pasta-veggie mix into the pan. Then, over top of that we carefully dolloped and spread about 2/3 of the cheese-egg mix. We added a thin layer of bread crumbs (the smallest ones, almost dust). Then, the rest of the pasta and the rest of the cheese goo. On top we sprinkled the Parmesan and the bulk of the bread crumbs.

We baked it uncovered for about 40 minutes in a well-preheated 375 degree oven. Some parts were crunchy, that's how we roll.

This dish would cost a small fortune if it weren't for the frozen leftover bread. To turn the hard butts into crumbs, Quincy used our cheap food processor. She microwaved a small bowl of ends and chopped. Repeat until done. Brilliant! This would have taken forever any other way. And we were left with a bag of bread crumbs for our next breading project. mmm.... maybe shrimp?

Tuesday, February 24, 2009

Weekend Gardening, continued

Three colors

The planting of four new species might have been the highlight of my weekend of gardening, but it wasn't the bulk of the work. I've got a fantastic grassy weed that I like to pull up for exercise. Great thing, that weed. Good thing it's invincible and everywhere.

One of my oldest plants is having a rough go of it. This rosemary is from The Home Depot about 8 years ago.

Real rosemary, fake bird.

I bought it as one of those "living Christmas trees" in a red pot while living up the street in my last apartment. I think it was Christmas 2002. After moving to this house in 2003, I planted it near the stairs. Ever since it has been wrapped in lights each Christmas season, even though it lost its dainty Christmas tree shape years ago.

Front Yard BeforeFront Yard

Last summer I cut back about 25% of the plant, because there seemed to be major die off. It thrived through the fall and winter, only to have the same sort of diseased death thing happen again this spring. So, back with the loppers, I cut it back very, very harshly. It looks windswept and Bonsai-like now. We'll see if it survives.

Rosemary took a beating

There's a lot of open space around it thanks to the pruning. (I scooped up about 4 pounds of fragrant needles.) I brushed off the dozens of bulbs coming up and relocated a hydrangea (also a veteran of at least 4 years) near it. I moved out an oppressed heather (pink, I think) to the back fence for rehabilitation. I think Quincy would like to see it go... but with so much space (and an embedded scarcity complex) I almost never through a living plant out.

The next to move was a little tree from the center of the front yard to the back yard near my (newly cemented) fence post. It might act as a deterrent for Grete's gardening efforts -- or it's just a good place to hide a struggling plant.

Another heather moved a few inches to fill in the gap. I pruned back our exotic, non-hardy creeping fuschia, which likely won't come back. Let's take a moment to remember the fallen from this season of frost:

Flax in snow at nightMy mom had tons of these when I was a kidFuchia

Cord RushSpring Star Flower

Two flax plants, a handful of hens-and-chicks, our purple-flowering lavender, the creeping fuschia, three delicate rushes, and the purple-star-flowering Ipheion uniflorum are all mostly like in a better place. Or mulch. Whatever. Unlike all the fish I killed while trying to keep a decent fish tank, I feel no guilt for killing off plants. It's what vegetarians do!

What I find is that after the first thirty minutes in the yard, pulling and trimming and digging, I stop clenching my jaw and start getting way more in tune with my body and my surroundings. I can walk carefully or quickly, think about something or nothing at all. Gardening is one of the few times that my brain really does go quiet. It's probably the closest I'll ever get to meditation. This weekend's exercise ran from 9am until nearly 3:00pm on Saturday. In all, I moved a dozen plants, did major clean up, and planted four new plants. Plus, I poured some concrete. More on that later.

Monday, February 23, 2009

Four New Front Yard Plants

Alta Southern Magnolia leaves

This last weekend I put in a few plants that we purchased at Swanson's during the second day of their late winter sale. The bare root deals (up to 40% off) are killer and the trees and shrubs are 25% off as well. Plus, it's much safer to transplant a dormant (or nearly dormant) plant than a root-bound potted flowering plant.

We have four new arrivals. We purchased both Blizzard Mockorange (philadelphus lewisii 'blizzard') and Blue Bird Rose of Sharon (Hibiscus syriacus 'blue bird') bare root, so I don't have any photos of those. I soaked them for 30 minutes in a bucket of water. Then they were put in decent sized holes with a mound of packed dirt supporting the root ball in the middle, back-filled with the same dark, rich soil. While I was soaking them I dug the holes and (finally) buried the low voltage line for the lights. I also installed a 20 watt spot for our new tree.

We've been looking for a tree for the southwest corner of the yard. Something tall and evergreen, flowering, and eye-catching. Those criteria create a short list. High on that was a Magnolia. We almost bought a dwarf last year, but the price seemed high. We scored a $70 8' Alta Southern Magnolia (magnolia grandiflora 'TMGH'). This is a beautiful tree that will gracefully drop a few leaves at a time, staying green and textured through the dark months of winter. Also, the huge white flower are both fragrant and beautiful. Quincy's first home in the UD had a huge mature magnolia tree.

Alta Southern Magnolia bud
Alta Southern Magnolia

Last but not least, we replaced a fallen favorite. Over the winter, during either the snow storm or the ice storm or the deep freeze, our Pittosporum engenioides lost all its leaves. I think it's dead, but I'm not positive -- there were signs of life in the roots. I moved the poor thing to the front of the fence (pictured) and hope for the best. Its replacement is a Pittosporum tennifolium; I thought it was exactly the same, but apparently they're slightly different. Still, the end result is a plant that looks like our old plant, just one year's less growth. I'll cover it this winter during any freezing or icy or snowy times.

Victim of the cold

Twice is a charm?

Sunday, February 22, 2009

The Seedling Process

Dill sprout in the distance

Everything I know about starting seeds I learned from Quincy, Cisco Morris, or Willi Galloway of Diggin' Food. Cisco is my gardening hero. Because of him I remembered to soak our bare-root shrubs before planting. Someday, I hope he will be the officiant to marry Quincy and me.

There are a number of keys to getting great starts from your seeds. Unsurprisingly, the top two are, generally speaking, water and light.

You can find good seed starting protocols all over the web. I won't bore you with details on starting mix or the Ordering of Things. Starting guides I find in line with Willi's talk can be found at Organic Gardening and Avant-Gardening (and I'm sure there are others!).

Using a starting mix instead of soil provides more appropriate absorption of water. There's no need for fancy fertilizer or nutrients, as the seed provides breakfast for our little plant. Pre-mixing the seed-starting mix in a bucket with water until lumpy and batter like prevents flooding. Last year, I carefully dolled out two seeds per cell in my trays, only to have the flooding from my first watering float them haphazardly. A trick we are using this year to avoid such a disaster is watering with only a spray bottle (brand new, cleaned). Covering the tray with a plastic lid (this year) or plastic wrap supported by chopsticks (last year) will keep the humidity high. So long as the medium doesn't dry out or start molding, you've got a good chance at successful seedlings.

We like to chart and graph, so we labeled our plants pretty well. We're keeping track of first planting, first sprouts, first cotyledons (baby leaves), first real leaves, when we harden and when we plant. From there we'll probably track first buds and edibles as well. All of this can be used next year to adjust our seed starting to accommodate our own micro-climate (micro-climates are real -- we get lots more snow than the other side of Phinney Ridge just six blocks away!). Since all those plant names don't fit on the little plant labels, we made a hash table that identifies them and gives us plenty of room for notes.

I built two grow lights (more on that later) for helping our seeds along. I don't really like the idea of using electricity to grow our plants, but in the dark Seattle spring, there's really no alternative. Also, we don't have sunny southern windows with a place for plants. The grow lights are placed only a few inches above the seeds (or tops of sprouts) to encourage stout plants. Last year all my plants were very leggy and leaned badly (no grow light and set out on the porch). We're giving these guys 16 hours of 26 watts. And here they come!

Yellow Pear Tomato seedlingsSeed tray

We decided not to use a starting mat (heat pad for dirt) because they're so pricey. If we don't get good results, we may change our mind for next year... but so far things are right on schedule.

So, that's what we're doing up to date. I'll write more as we do more.

I had mentioned that we knew when to start the seeds. Charts for figuring when to seed and set out plants based on last frost date can be found at Mother Earth News and Organic Gardening.

Saturday, February 21, 2009

Seedlings

Seedling in Q's eye

This month marks the beginning of the beginning of spring planting. When one works backwards from our common last frost date (Mother's Day weekend) and accounts for germination periods and the such, the first of the seeds need to be started in mid February.


This is my second seed starting year. Last year I tossed some seeds in dirt (mind you, not soil or medium), threw plastic wrap over them, and waited for sprouts. I did this mid-spring, well after the last frost date. Everything I planted grew, but with limited success.

Peas!

With the addition of Chief Researcher to my garden's staff, we took a completely different approach this year. Quincy found a free seed starting class offered at Molbak's in Woodinville by Willi Galloway of Diggin' Food. She's no Cisco, but I think they might be related. Just a bit.

The talk was a fantastic trove of information. We left with exactly everything we needed to have a chance at successful starts and a bumper crop.

Beets from the yard

When I posted about our 2009 seed collection, I really had no idea where we were going to put all these. Now, with all the starts starting, I wonder even more!

Last weekend we started 24 Shallots, 24 Dill, 24 Yellow Pear Tomato, some salad greens and 72 Super Sugar Peas. We did so per the instructions of Willi (next blog post). Already this weekend we're seeing many sprouts poking their heads above the soil. Quincy marked down the various sprouts on our handy grid. We turned the grow light on last night for the first time. So exciting!

Onion sproutWe like charts and tables and data

Wednesday, February 18, 2009

What Grete dreams about


In lieu of a real blog post, I thought I'd share this photo from Getting Stitched on a Farm. I'd probably prefer goats, but I'm sure Grete would love some lamb herding.

I'll be back up blogging soon. My computer contracted a winter virus which I'm finally going to get around to fixing tonight. Much to catch up on!

Wednesday, February 11, 2009

Laughing Buddha.

Well, for a devout Christian, my dad sure has the classic Buddha belly-laugh down pat. And, as Quincy is apt to point out, he and I share a lot of quirks and traits. That's probably why she likes him -- because she actually likes me. The apple doesn't fall far from the tree... nor does it have a flattering hair line.

My dad and I embarked on a series of projects around the house during his recent visit. We accomplished:
- changing the back door dead bolt
- changing and fixing the front doorknob
- adding a deadbolt to the front door
- adding a coat rack near the front door
- installing the electrical for the Insinkerator garbage disposal unit
- and investigating the joist scabs in the basement and external low voltage lighting solution in the back yard and bathroom venting idea

Not bad for two days' work. On Friday, we rested and ate and ate and shopped and ate. Quincy and Deb, of course, joined in. There was a dog park in there somewhere, too.

Pictured: the much-awaited hole in our 83 year old front door. While the finish my be melting on the inside, this is a classic door that I did not want to ruin. With my dad's guidance, I did not. Here's what I learned about drilling a hole in an old door.

First: start from the outside. If the door is really old and solid core, you'll get about 2/3 through at most. From there, continue to drill the pilot hole through to the inside. Then, drill out the core from the inside. All the while you're best to keep the drill moving slowly, and have a person stand by your side to help you keep the drill level on both axes (up/down and left/right). Don't even try this with a cordless "drill;" you need power.

When drilling out the holes in the door frame, measure, double measure, have someone check your work, and then measure again. I did two measures (my standard) from the wrong starting point. Sure enough, i ended up with a bigger hole than I needed for the deadbolt (easily fixed, but frustrating nonetheless). This would have been a disaster if my door frame wasn't made out of old growth 4x6. Seriously. Kick this door in? You're more likely to break your foot.

As for the lessons learned in the coat rack, they're pretty standard. I'm always ready to try different non-standard solutions to a problem I used an insert in the hanging bolts as a makeshift locking nut of zero-width; this turned out to be the solution to an uneven lath and plaster wall with a slightly warped oak coat rack. This project was scheduled for 30 minutes and took nearly two hours end-to-end.

Actually, everything took longer than expected. We had an expected but unfortunate drilling adventure with the power line for the garbage disposal; we had a totally unexpected adventure with the knock out in the disposal unit (picture my dad banging on the unit's underbelly with wire nose pliers and a mallet for 30 minutes). And, the previously described door jamb debacle.

In the end, everything was done to our exacting standard. And, I have all I need to finish a few other projects, including one I already finished (I finally installed proper ducting to vent the bathroom to the outside, instead of the attic).

What's next? How about a fence post, some lights, and reinforcing joists?

Tuesday, February 03, 2009

Wild Nights (or rather, how we sewed a liner for my hamper)

Home made hamper liner
Tuesday evenings for the last three months have served as a special time for Quincy and I. We always have dinner together in Fremont. We always arrive home at the same time. I always drive her home the long way. (Sometimes we stop at the Flying Apron for snacks; sometimes we go to a movie; once we went to the liquor store.) I've avoided making plans with others and so has Quincy. It makes for a nice break in the week. Most nights this winter we've collapsed on the couch and watched Media-Center-recorded teevee. Tonight, after dinner at Tawon Thai and picking up pet food at Mud Bay, we had some energy, so we kept the TV off.

Quincy decided to fire up a laptop and work a bit for Big Retail. I decided to embark on Sewing Project #2: a liner for my wicker clothes hamper. (Project number one involved sewing two fuzzy-soft pieces of fabric together to make a massive snuggly blanket.) You might ponder, "what happened to your evening together?" Ha! You think I know the first thing about sewing?

As the photos show, much success was had. Quincy helped me figure out that a hamper liner was just a rectangle and a circle sew together. she helped me measure out her linen fabric so that it was fairly square and the right size, and gave some crucial pinning advice ("one piece at a time"). In the end, my circle was (by design) just a little too big around for the rectangle-sewn-cylinder. I ended up pleating the circle, which gave the liner a pleasant baggy quality often lacking in store bought versions.

In all, the project took less than two hours. I could make another in about 30 minutes, now that I know the patterns, how to pin, and how to sew in a circle. Oh, did I mention Quincy also set up the sewing machine, found the scissors, and reminded me to put the foot down? Yeah, maybe I should say that Quincy made the liner! (while I was blogging this, Quincy sewed a dog toy. I have much to learn.)