Well, for a devout Christian, my dad sure has the classic Buddha belly-laugh down pat. And, as Quincy is apt to point out, he and I share a lot of quirks and traits. That's probably why she likes him -- because she actually likes me. The apple doesn't fall far from the tree... nor does it have a flattering hair line.
My dad and I embarked on a series of projects around the house during his recent visit. We accomplished:
- changing the back door dead bolt
- changing and fixing the front doorknob
- adding a deadbolt to the front door
- adding a coat rack near the front door
- installing the electrical for the Insinkerator garbage disposal unit
- and investigating the joist scabs in the basement and external low voltage lighting solution in the back yard and bathroom venting idea
Not bad for two days' work. On Friday, we rested and ate and ate and shopped and ate. Quincy and Deb, of course, joined in. There was a dog park in there somewhere, too.
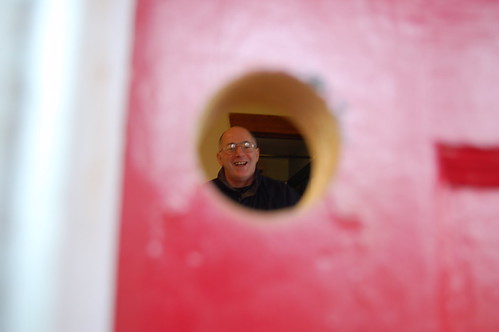
Pictured: the much-awaited hole in our 83 year old front door. While the finish my be melting on the inside, this is a classic door that I did not want to ruin. With my dad's guidance, I did not. Here's what I learned about drilling a hole in an old door.
First: start from the outside. If the door is really old and solid core, you'll get about 2/3 through at most. From there, continue to drill the pilot hole through to the inside. Then, drill out the core from the inside. All the while you're best to keep the drill moving slowly, and have a person stand by your side to help you keep the drill level on both axes (up/down and left/right). Don't even try this with a cordless "drill;" you need power.
When drilling out the holes in the door frame, measure, double measure, have someone check your work, and then measure again. I did two measures (my standard) from the wrong starting point. Sure enough, i ended up with a bigger hole than I needed for the deadbolt (easily fixed, but frustrating nonetheless). This would have been a disaster if my door frame wasn't made out of old growth 4x6. Seriously. Kick this door in? You're more likely to break your foot.
As for the lessons learned in the coat rack, they're pretty standard. I'm always ready to try different non-standard solutions to a problem I used an insert in the hanging bolts as a makeshift locking nut of zero-width; this turned out to be the solution to an uneven lath and plaster wall with a slightly warped oak coat rack. This project was scheduled for 30 minutes and took nearly two hours end-to-end.
Actually, everything took longer than expected. We had an expected but unfortunate drilling adventure with the power line for the garbage disposal; we had a totally unexpected adventure with the knock out in the disposal unit (picture my dad banging on the unit's underbelly with wire nose pliers and a mallet for 30 minutes). And, the previously described door jamb debacle.
In the end, everything was done to our exacting standard. And, I have all I need to finish a few other projects, including one I already finished (I finally installed proper ducting to vent the bathroom to the outside, instead of the attic).
What's next? How about a fence post, some lights, and reinforcing joists?
Border Message
1 day ago


No comments:
Post a Comment